My blog is a static website hosted on Netlify. Without delving into too much details, Netlify pulls content from my GitHub repository, builds it, and deploys it on a server. Netlify also deals with SSL for me, which is great. However, as it commonly happens with abstractions, this simplicity ends up hiding the complexities and interesting details of the process. That’s why I decided to get deeper into the topic and see by myself what’s happening. In this post I’ll talk about SSL certificates and show how to verify them step-by-step.
What’s SSL?
My doctor’s website shows this warning:
Your connection to this site is not secure. You should not enter any sensitive information on this site (for example, passwords or credit cards) because it could be stolen by attackers.
Many websites seem to have the same issue. If your browser is particularly strict (and that’s good) it might even prevent you from visiting the website, unless you explicitly make it clear that that’s exactly what you want. Simplifying a bit, that’s to protect users from getting hurt, and it’s happening because the website doesn’t have a valid SSL certificate.
SSL (Secure Sockets Layer) is an encryption-based protocol. A protocol defines the way data is transmitted between the participants in a communication. More specifically, SSL defines how a client (like a browser) can safely communicate with a server (for example my website). In this context, safely means that the communication is secured for encryption, integrity and authentication. In order to demonstrate that it can safely communicate with a browser, a web server needs to show its SSL certificate.
Note: today, in 2023, when we say SSL we usually mean TLS. SSL was developed by Netscape in 1995 and further improved in 1999, thus becoming TLS (Transport Layer Security). The “real” SSL is deprecated today, but its name is widely used to identify TLS too. It’s also important to know that SSL is used in HTTPS: let’s say that when a website has an SSL certificate, you can visit it using the HTTPS protocol (
https://) and the browser will be happy.
Ok, so my browser complains whenever I visit a website that doesn’t have an SSL certificate. That’s because the browser knows that I won’t be safe on that website: if I communicate my username, password, or any other important information to this unsafe server, my data can easily be compromised. For example, if I’m working in a café and someone else is sharing the same WiFi, this person could sniff the data that is being transmitted “in clear” (unencrypted) from my browser to the unsafe website. And if I’m re-using the same credentials for other websites (don’t do it) this person could just as easily gain access to those as well.
One solution would then be to find a way to encrypt the data exchanged between the browser and the server. That’s part of what SSL does.
How does SSL work?
As said, SSL is an encryption-based protocol. One of the tasks of cryptography in SSL is to verify the identity of the parts involved thanks to something called digital signature.
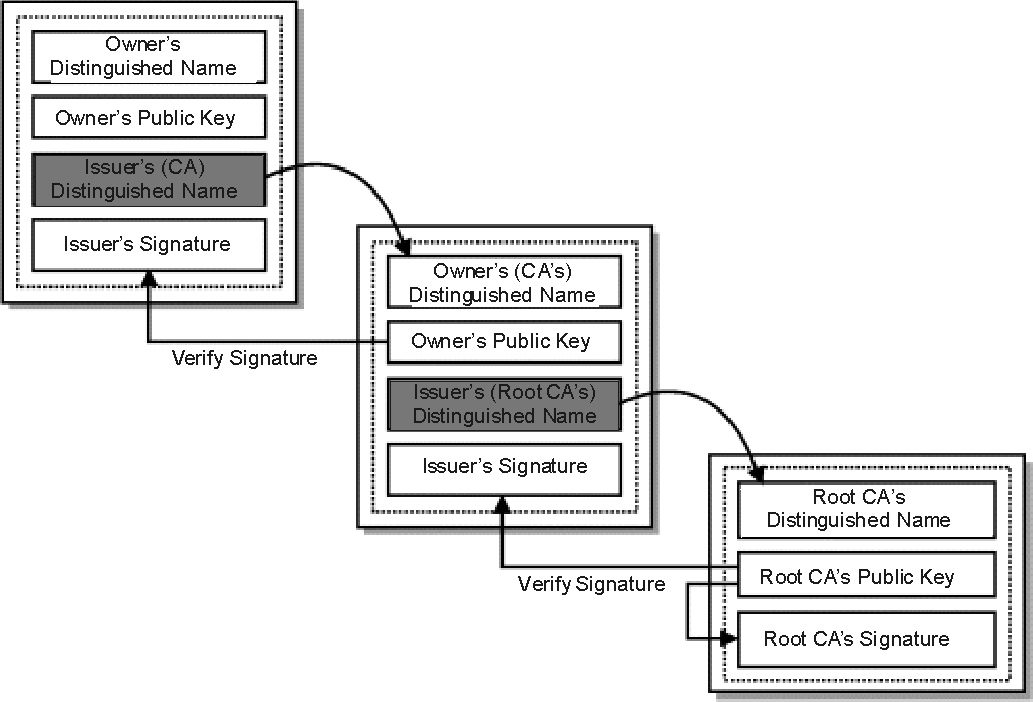
In asymmetric encryption, two keys (private and public) are used to respectively encrypt and decrypt data. When it comes to a digital signature, the private key is used to sign (encrypt) the message, while the public key is used to verify (decrypt) it. The digital signature is a way to certify that this message (the SSL certificate in our case) has not been modified by anyone from the moment it was approved.
In the context of SSL, the web server generates its own public-private keypair. It then encrypts part of the SSL certificate using the private key. When the browser reaches the server, the server sends its SSL certificate together with the public key to declare: “Yes, I’m a secure website!”. The browser can now use the public key to verify this is true. I’ll get into way more details below, but let’s first proceed with the bigger picture.
Certificate Authorities (CA) and digital signatures
So the server has a certificate. Great. But how can we trust its authenticity? If I was a malicious hacker I’d try to fake the certificate and state that the website is secure, even if it’s not. This is where a Certificate Authority comes into play.
A Certificate Authority (CA) is an entity that issues SSL certificates, and it’s basically our final source of trust when it comes to assessing a website’s authenticity. There are many prerequisites to become a CA and it’s definitely not an easy process. Some of the main authorities on the market right now are IdenTrust (that cross-signs Let’s Encrypt intermediate certificates) and DigiCert.
Note: if you want to know what can go wrong when a Certificate Authority is compromised, I recommend reading about DigiNotar and listening to the DigiNotar episode of the excellent Darknet Diaries podcast by Jack Rhysider.
The CA takes the certificate and uses its private key to “sign” it, generating a hash called digital signature (I’ll discuss the details later). Once the browser receives it, it goes the other way around: it decrypts the signature using the public key of the CA and then compares the resulting value with the original SSL certificate. If the two match, it means that the certificate hasn’t been tampered with and the site can be trusted.
Note: how does a browser know the public key of the CA? These keys are included in the CA certificate, which comes directly together with the browser or the OS. On macOS, for example, I can see my certificates by opening the Keychain Access app. This is called local trust store or local certificate store.
How to validate an SSL certificate
For this example, I’ll verify the certificate of my own website. In order to do that, we first need to download the certificate. I’m using Chrome, but the following steps should be easily reproducible on any other browser.
- Go to your SSL-secure website (I’ll use https://www.keenformatics.com in my examples);
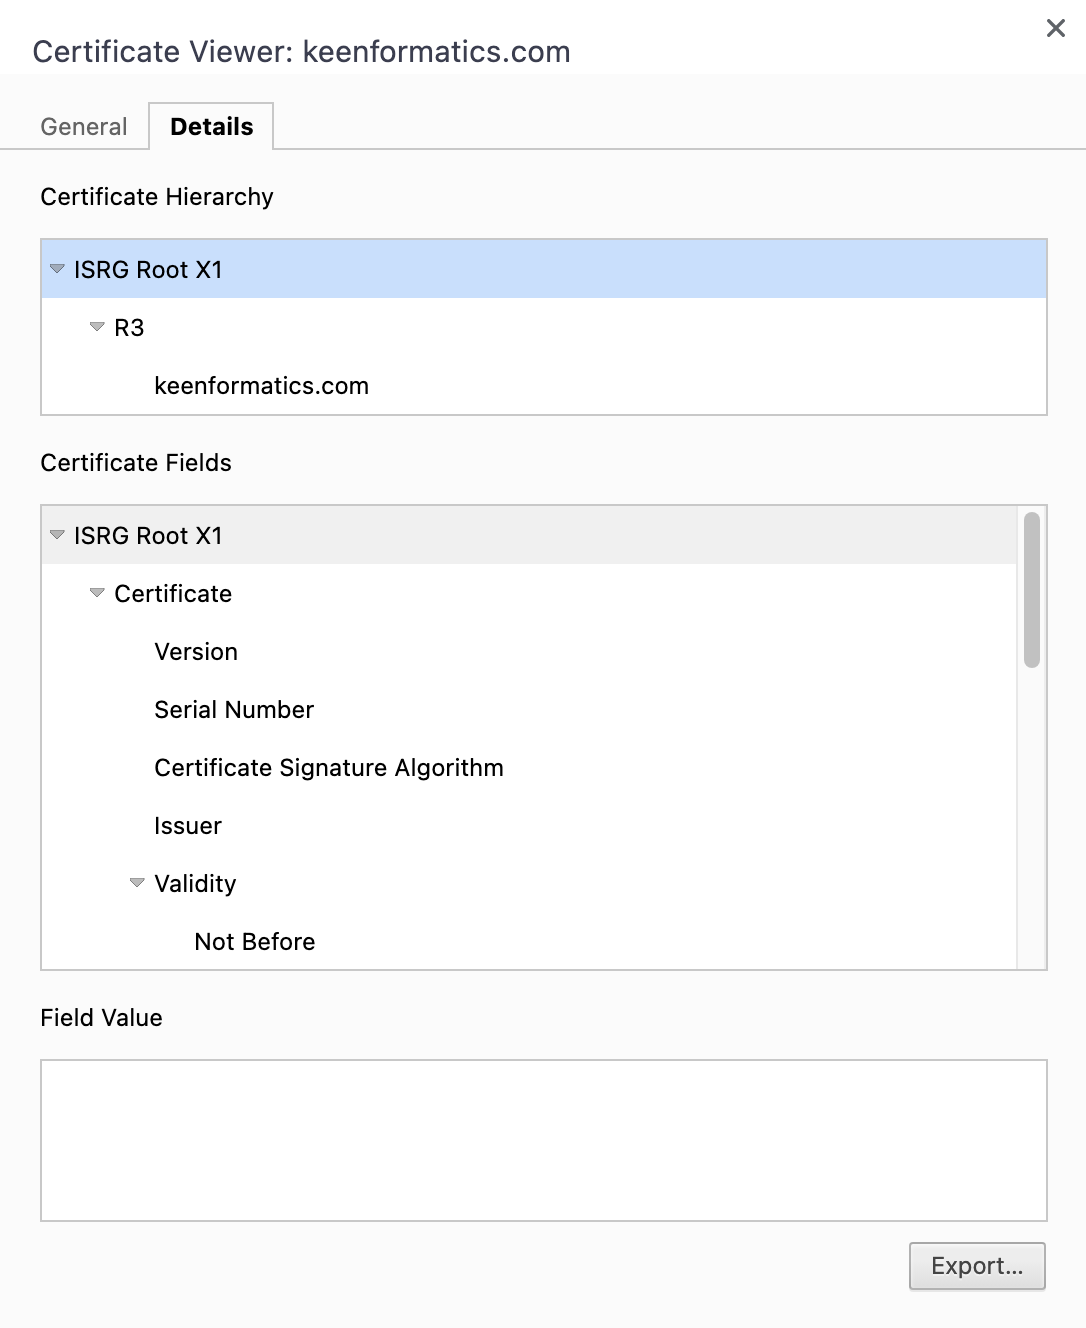
- click on the Lock icon > “Connection is secure” > “Certificate is valid” to open the certificate information;
- click on the “Details” tab.
This view represents the Certificate Hierarchy. Each row in the hierarchy is the name of a certificate (from root to leaf). There can be multiple intermediate certificates that lead to that specific website’s certificate. In my case I have ISRG Root X1 > R3 > keenformatics.com. We need all of them, so click on each single one of them at a time, and click on “Export…”. Yes, you need to repeat the operation for each certificate in the hierarchy.
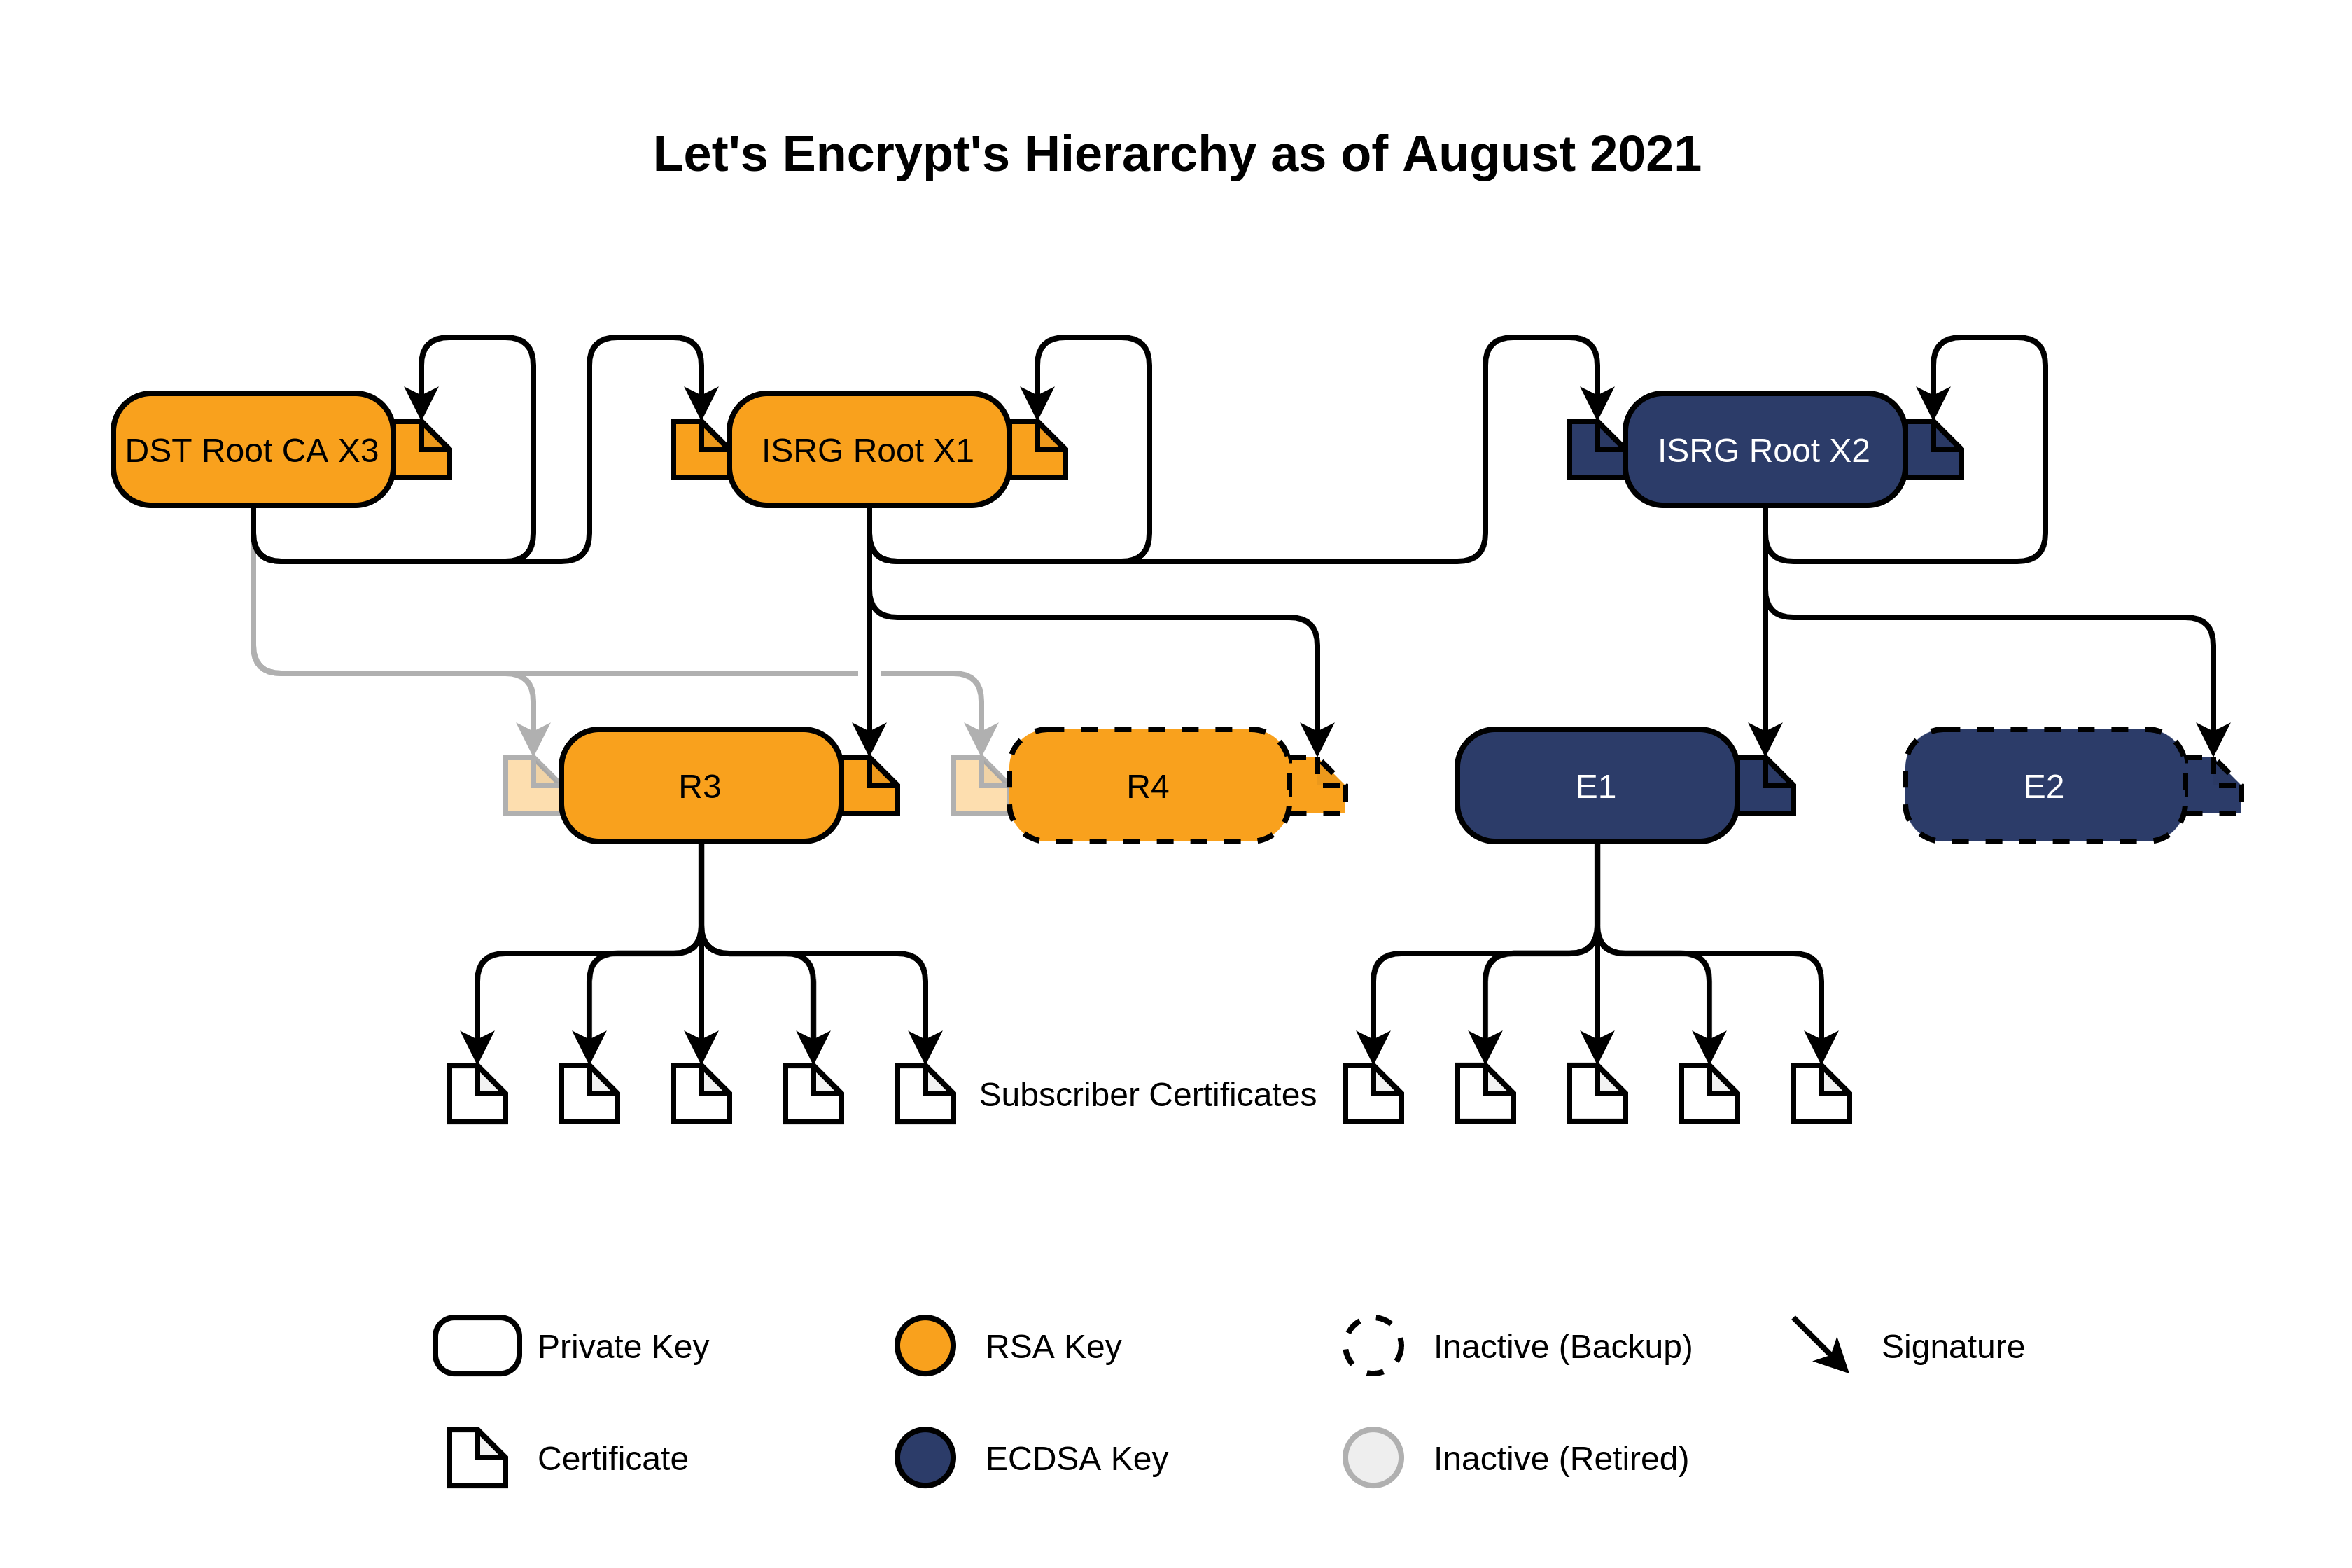
Since my website is hosted by Netlify, which relies on the Let’s Encrypt CA for its SSL certificates, the hierarchy above is the same documented on Let’s Encrypt’s website:
Now that we have all the certificates in our hierarchy, we can check if they are valid. To verify the leaf of the hierarchy (that refers to the actual website we’re investigating) we need to verify all other certificates as well.
Going forward, I’ll show two ways to verify SSL certificates:
How to verify SSL certificates using openssl
In the previous section we downloaded all the certificates in the server’s certificate hierarchy. Their filenames are:
ISRGRootX1.cer(the root certificate)R3.cer(the intermediate certificate)keenformatics.com.cer(the leaf certificate)
We want to verify that the “path of certifications” that leads from the root down to the leaf certificate is valid. To do that, we can use the OpenSSL library.
What I initially tried was this, which failed:
$ openssl verify -verbose -CAfile ISRGRootX1.cer keenformatics.com.cer
CN = keenformatics.com
error 20 at 0 depth lookup:unable to get local issuer certificate
keenformatics.com.cer: verification failed: 20 (unable to get local issuer certificate)
The reason why this is failing is that I was trying to directly verify the leaf using only the root, without mentioning the intermediate R3.cer certificate.
What we need to do instead is to specify all the intermediate certificates using the -untrusted option. The weird thing is that, to do so, we need to have the root and all the intermediate certificates inside a single file (I will call it intermediate.cer). I’m not really a fan of this interface, but that’s how it works. We can create this file like this:
$ cat ISRGRootX1.cer R3.cer > intermediate.cer
Let’s now run the correct command:
$ openssl verify -verbose \
    -CAfile ISRGRootX1.cer \
    -untrusted intermediate.cer keenformatics.com.cer
keenformatics.cer: OK
The verification is successful! We’ve verified all our certificates using openssl. But now I feel like I want to know more.
How to manually verify SSL certificates
Using openssl as we did in the previous section is probably the best way to verify certificates from terminal. However, I’m still curious to know what is actually happening under the hood. So I decided to dive a bit deeper and verify my certificates with a more hands-on procedure.
Decoding the contents of an SSL certificate
It’s good to know that there are two main types of encodings used for certificates:
- DER encoded binary X.509
- Base64 encoded X.509
It seems like the .cer extension is usually used for DER files, while Base64 files have the .pem extension. This doesn’t seem to be a strict rule though: in my case, in fact, the files downloaded from the browser are .cer files in base64 format.
I want to decode the certificates and have a preview of their content in “human language”. We can once again use openssl for this:
# For PEM files
openssl x509 -inform pem -noout -text -in <PEM-encoded-file>
# For DER files
openssl x509 -inform der -noout -text -in <DER-encoded-file>
Using the root certificate as a starting point, the outcome will be this (I’ll shorten some long values for readibility):
$ openssl x509 -inform pem -noout -text -in ISRGRootX1.cer
Certificate:
    Data:
        Version: 3 (0x2)
        Serial Number:
            82:10:cf:b0:d2:40:e3:59:44:63:e0:bb:63:82:8b:00
    Signature Algorithm: sha256WithRSAEncryption
        Issuer: C=US, O=Internet Security Research Group, CN=ISRG Root X1
        Validity
            Not Before: Jun  4 11:04:38 2015 GMT
            Not After : Jun  4 11:04:38 2035 GMT
        Subject: C=US, O=Internet Security Research Group, CN=ISRG Root X1
        Subject Public Key Info:
            Public Key Algorithm: rsaEncryption
                RSA Public-Key: (4096 bit)
                Modulus:
                    00:ad:e8:24:(...trimmed)
                Exponent: 65537 (0x10001)
        X509v3 extensions:
            X509v3 Key Usage: critical
                Certificate Sign, CRL Sign
            X509v3 Basic Constraints: critical
                CA:TRUE
            X509v3 Subject Key Identifier:
                79:B4:59:E6:7B:B6:E5:E4:01:73:80:08:88:C8:1A:58:F6:E9:9B:6E
    Signature Algorithm: sha256WithRSAEncryption
         55:1f:58:a9:bc:b2:(...trimmed)
Here we can see the subject name:
Subject: C=US, O=Internet Security Research Group, CN=ISRG Root X1
CN means “Common Name” and O stands for “Organization”. In the leaf certificate, the CN value must be the domain of the website using the certificate (you can verify it by reading the contents of keenformatics.com.cer).
Another relevant piece of information is the issuer of the certificate. This is the CA authority that is certifying the identity of the website:
Issuer: C=US, O=Internet Security Research Group, CN=ISRG Root X1
If the Subject and Issuer fields have the same value, it might mean that the certificate has been self-signed (while this is true here, it might not always be the case).
Note: the “Internet Security Research Group” is the nonprofit behind Let’s Encrypt CA.
We also get to see the public key of the web server, represented as a 4096 bit hex:
Subject Public Key Info:
    Public Key Algorithm: rsaEncryption
        RSA Public-Key: (4096 bit)
        Modulus:
            00:ad:e8:24:(...trimmed)
        Exponent: 65537 (0x10001)
The public key here is made of two values: they are the modulus and the exponent used by the RSA encryption algorithm to generate the digital signature (I’ll tell more about it later). If you want to just see the public key as base64, you can use this handy openssl command:
$ openssl x509 -inform pem -pubkey -noout -in ISRGRootX1.cer
Going back to the text content of the certificate, the details of the digital signature are shown as hex at the end:
Signature Algorithm: sha256WithRSAEncryption
    55:1f:58:a9:bc:b2:(...trimmed)
Let’s now take one step further in the hierarchy and focus our attention on the intermediate certificate (R3.cer). If we check who’s the issuer of this certificate, we get this:
$ openssl x509 -inform pem -issuer -noout -in R3.cer
issuer= /C=US/O=Internet Security Research Group/CN=ISRG Root X1
This tells us that the CA that owns the root certificate (ISRGRootX1) has signed the intermediate certificate (R3). We were expecting this, since the ISRGRootX1 certificate was the “parent” of the R3 certificate.
Given what we know about digital signatures, this means that we should be able to use the public key of the root certificate to verify the digital signature on the intermediate certificate.
Finding the hash of the SSL certificate
Right now, we know how to find the public key and the digital signature of our SSL certificates. As we saw earlier, the digital signature is generated by magically combining (yes, maths) the private key of the issuer together with the data it wants to sign.
We were able to find the digital signature of the certificate inside of the certificate itself. This means that the digital signature is not actually signing the entire certificate (otherwise it would have to sign itself) but rather only a part of it.
In fact, a certificate is made of 3 parts:
tbsCertificatesignatureAlgorithmsignatureValue
The digital signature is generated by signing only the tbsCertificate part (where tbs stands for “To Be Signed”).
The tbsCertificate field contains the names of the subject and issuer, a public key associated with the subject, a validity period, and other associated information. (RFC 5280 specification)
Actually, since the size of the signature depends on the size of the message, signing the full tbsCertificate might result in a signature way too big. Therefore, the contents of the tbsCertificate field are often hashed first (e.g. using an algorithm like SHA-256) and then this hash is used as the “message” to generate the digital signature.
Finding the content of the tbsCertificate is quite a long procedure. Let’s get to it.
-
Convert the certificate from PEM (base64) to DER (binary):
$ openssl x509 -inform PEM -outform DER -in ISRGRootX1.cer -out ISRGRootX1.derWe want a binary file because we’ll soon find the exact location of the
tbsCertificatebytes inside of it. -
Convert the PEM certificate to ASN.1 format (ASN.1 is a language used to define file formats). This is needed to extract the location of the
tbsCertificatedefinition:$ openssl asn1parse -inform pem -in ISRGRootX1.cer >> ISRGRootX1.asn1 -
Now open the ASN.1 certificate and take note of the second line:
 $ head -2 ISRGRootX1.asn1
 0:d=0  hl=4 l=1387 cons: SEQUENCE
 4:d=1  hl=4 l= 851 cons: SEQUENCE
The second line is telling us where we can find the
tbsCertificatein the DER (binary) file. The offset is 4, the size 855 (head lengthhl+ body lengthl). -
We can use the information extracted from the ASN.1 file to dump only the relevant part of the binary certificate that contains the
tbsCertificatefield, like this:$ dd if=ISRGRootX1.der of=ISRGRootX1.tbsCertificate skip=4 bs=1 count=856 856+0 records in 856+0 records out 856 bytes transferred in 0.004911 secs (174303 bytes/sec) -
Now remember that in our ISRGRootX1 certificate’s text we saw this line:
Signature Algorithm: sha256WithRSAEncryptionThis means that the digital signature was obtained from the SHA-256 hash of the original message (
tbsCertificate). As I explained above, the reason why they use a hash is that the signature would be too long (as long as the message). So, rather than using the certificate itself as “message” to compute the signature, they use a hashed version of it (which is shorter).So we want to generate the SHA-256 value of the
tbsCertificate. That’s how we do it:$ shasum -a 256 ISRGRootX1.tbsCertificate 3f0411ede9c4477057d57e57883b1f205b20cdc0f3263129b1ee0269a2678f63 ISRGRootX1.tbsCertificate
We need to keep this hash at hand, because we’re going to need it to verify the certificate.
Verifying the SSL certificate
In our certificates, we saw that the signature algorithm was sha256WithRSAEncryption. What we want to do now is to apply all the steps of the RSA encryption algorithm to obtain a SHA-256 hash; we will then compare this hash to the one we got earlier when we hashed the tbsCertificate. If these two hashes match, it means that our certificate is verified.
The RSA algorithm
The RSA algorithm can be broken up in two parts:
- encryption (signing the message)
- decryption (verifying the message)
This is the procedure to sign the message:
\[ \boxed{ signature = message^{privateKey}\bmod{N} } \]
and this is how a message is verified:
\[ \boxed{ message^{1} = signature^{publicKey}\bmod{N} } \]
If \( message = message^{1} \) it means that the message is verified.
To verify the SSL certificate, we therefore want to replicate the second formula. To obtain the message (our SHA-256 hash) we need three elements:
- the digital signature
- the public exponent
- the modulus value
If you look at the certificates we have downloaded, we have all these values: \( publicKey \) and \( N \) can be found under the Subject Public Key Info section. Here, N is called “Modulus” and publicKey is “Exponent” (because it is the public exponent used in RSA).
This means that we can proceed and verify the certificate.
Computing the SSL message using Python
To verify the whole certificate hierarchy, we will start from the root certificate and go all the way down to the leaf.
Since the root certificate (ISRGRootX1) is self-signed, we have all the values we need inside of it. I’ll use Python for the computation:
# Modulus and exponent from ISRGRootX1
modulus = 0x00ade82473f41437f39b9e2b57281c87bedcb7df38908c6e3ce657a078f775c2a2fef56a6ef6004f28dbde68866c4493b6b163fd14126bbf1fd2ea319b217ed1333cba48f5dd79dfb3b8ff12f1219a4bc18a8671694a66666c8f7e3c70bfad292206f3e4c0e680aee24b8fb7997e94039fd347977c99482353e838ae4f0a6f832ed149578c8074b6da2fd0388d7b0370211b75f2303cfa8faeddda63abeb164fc28e114b7ecf0be8ffb5772ef4b27b4ae04c12250c708d0329a0e15324ec13d9ee19bf10b34a8c3f89a36151deac870794f46371ec2ee26f5b9881e1895c34796c76ef3b906279e6dba49a2f26c5d010e10eded9108e16fbb7f7a8f7c7e50207988f360895e7e237960d36759efb0e72b11d9bbc03f94905d881dd05b42ad641e9ac0176950a0fd8dfd5bd121f352f28176cd298c1a80964776e4737baceac595e689d7f72d689c50641293e593edd26f524c911a75aa34c401f46a199b5a73a516e863b9e7d72a712057859ed3e5178150b038f8dd02f05b23e7b4a1c4b730512fcc6eae050137c439374b3ca74e78e1f0108d030d45b7136b407bac130305c48b7823b98a67d608aa2a32982ccbabd83041ba2830341a1d605f11bc2b6f0a87c863b46a8482a88dc769a76bf1f6aa53d198feb38f364dec82b0d0a28fff7dbe21542d422d0275de179fe18e77088ad4ee6d98b3ac6dd27516effbc64f533434f
exponent = 65537
# signature from ISRGRootX1
signature = 0x551f58a9bcb2a850d00cb1d81a6920272908ac61755c8a6ef882e5692fd5f6564bb9b8731059d321977ee74c71fbb2d260ad39a80bea17215685f1500e59ebcee059e9bac915ef869d8f8480f6e4e99190dc179b621b45f06695d27c6fc2ea3bef1fcfcbd6ae27f1a9b0c8aefd7d7e9afa2204ebffd97fea912b22b1170e8ff28a345b58d8fc01c954b9b826cc8a8833894c2d843c82dfee965705ba2cbbf7c4b7c74e3b82be31c822737392d1c280a43939103323824c3c9f86b255981dbe29868c229b9ee26b3b573a82704ddc09c789cb0a074d6ce85d8ec9efceabc7bbb52b4e45d64ad026cce572ca086aa595e315a1f7a4edc92c5fa5fbffac28022ebed77bbbe3717b9016d3075e46537c3707428cd3c4969cd599b52ae0951a8048ae4c3907cecc47a452952bbab8fbadd233537de51d4d6dd5a1b1c7426fe64027355ca328b7078de78d3390e7239ffb509c796c46d5b415b3966e7e9b0c963ab8522d3fd65be1fb08c284fe24a8a389daac6ae1182ab1a843615bd31fdc3b8d76f22de88d75df17336c3d53fb7bcb415fffdca2d06138e196b8ac5d8b37d775d533c09911ae9d41c1727584be0241425f67244894d19b27be073fb9b84f817451e17ab7ed9d23e2bee0d52804133c31039edd7a6c8fc60718c67fde478e3f289e0406cfa5543477bdec899be91743df5bdb5ffe8e1e57a2cd409d7e6222dade1827
# Compute the message following the RSA algorithm
message = pow(signature, exponent, modulus)  # Equivalent to signature**exponent % modulus
# Print the hex value
print(f"{format(message, 'x')}")
1ffffffffffffffffffffffffffffffffffffffffffffffffffffffffffffffffffffffffffffffffffffffffffffffffffffffffffffffffffffffffffffffffffffffffffffffffffffffffffffffffffffffffffffffffffffffffffffffffffffffffffffffffffffffffffffffffffffffffffffffffffffffffffffffffffffffffffffffffffffffffffffffffffffffffffffffffffffffffffffffffffffffffffffffffffffffffffffffffffffffffffffffffffffffffffffffffffffffffffffffffffffffffffffffffffffffffffffffffffffffffffffffffffffffffffffffffffffffffffffffffffffffffffffffffffffffffffffffffffffffffffffffffffffffffffffffffffffffffffffffffffffffffffffffffffffffffffffffffffffffffffffffffffffffffffffffffffffffffffffffffffffffffffffffffffffffffffffffffffffffffffffffffffffffffffffffffffffffffffffffffffffffffffffffffffffffffffffffffffffffffffffffffffffffffffffffffffffffffffffffffffffffffffffffffffffffffffffffffffffffffffffffffffffffffffffffffffffffffffffffffffffffffffffffffffffffffffffffffffff003031300d0609608648016503040201050004203f0411ede9c4477057d57e57883b1f205b20cdc0f3263129b1ee0269a2678f63
As you can see, the last digits of the printed message match exactly the SHA-256 hash of the tbsCertificate that we have computed earlier:
3f0411ede9c4477057d57e57883b1f205b20cdc0f3263129b1ee0269a2678f63
This means that we just verified the root certificate!
Verifying the children certificates
The procedure, from now on, will be the same. The only difference is that we will use the signature found in the certificate we’re verifying, while the modulus and the exponent will be taken from the parent certificate.
Let’s verify the intermediate certificate R3 using its parent ISRGRootX1:
# Convert the certificate to DER (binary) format
openssl x509 -inform PEM -outform DER -in R3.cer -out R3.der
# Convert the certificate to ASN.1 format
openssl asn1parse -inform pem -in R3.cer >> R3.asn1
# Show the content and copy the second line
sed -n 2p R3.asn1
# 4:d=1  hl=4 l= 766 cons: SEQUENCE

# Dump only the relevant part of the binary certificate that contains the tbsCertificate
dd if=R3.der of=R3.tbsCertificate skip=4 bs=1 count=770
# Compute the SHA-256 of the tbsCertificate
shasum -a 256 R3.tbsCertificate
# 444ebd67bb83f8807b3921e938ac9178b882bd50aadb11231f044cf5f08df7ce  R3.tbsCertificate
Now let’s head on to Python for the comparison:
# Modulus and exponent from ISRGRootX1
modulus = 0x00ade82473f41437f39b9e2b57281c87bedcb7df38908c6e3ce657a078f775c2a2fef56a6ef6004f28dbde68866c4493b6b163fd14126bbf1fd2ea319b217ed1333cba48f5dd79dfb3b8ff12f1219a4bc18a8671694a66666c8f7e3c70bfad292206f3e4c0e680aee24b8fb7997e94039fd347977c99482353e838ae4f0a6f832ed149578c8074b6da2fd0388d7b0370211b75f2303cfa8faeddda63abeb164fc28e114b7ecf0be8ffb5772ef4b27b4ae04c12250c708d0329a0e15324ec13d9ee19bf10b34a8c3f89a36151deac870794f46371ec2ee26f5b9881e1895c34796c76ef3b906279e6dba49a2f26c5d010e10eded9108e16fbb7f7a8f7c7e50207988f360895e7e237960d36759efb0e72b11d9bbc03f94905d881dd05b42ad641e9ac0176950a0fd8dfd5bd121f352f28176cd298c1a80964776e4737baceac595e689d7f72d689c50641293e593edd26f524c911a75aa34c401f46a199b5a73a516e863b9e7d72a712057859ed3e5178150b038f8dd02f05b23e7b4a1c4b730512fcc6eae050137c439374b3ca74e78e1f0108d030d45b7136b407bac130305c48b7823b98a67d608aa2a32982ccbabd83041ba2830341a1d605f11bc2b6f0a87c863b46a8482a88dc769a76bf1f6aa53d198feb38f364dec82b0d0a28fff7dbe21542d422d0275de179fe18e77088ad4ee6d98b3ac6dd27516effbc64f533434f
exponent = 65537
# signature from R3
signature = 0x85ca4e473ea3f7854485bcd56778b29863ad754d1e963d336572542d81a0eac3edf820bf5fccb77000b76e3bf65e94dee4209fa6ef8bb203e7a2b5163c91ceb4ed3902e77c258a47e6656e3f46f4d9f0ce942bee54ce12bc8c274bb8c1982fa2afcd71914a08b7c8b8237b042d08f908573e83d904330a472178098227c32ac89bb9ce5cf264c8c0be79c04f8e6d440c5e92bb2ef78b10e1e81d4429db5920ed63b921f81226949357a01d6504c10a22ae100d4397a1181f7ee0e08637b55ab1bd30bf876e2b2aff214e1b05c3f51897f05eacc3a5b86af02ebc3b33b9ee4bdeccfce4af840b863fc0554336f668e136176a8e99d1ffa540a734b7c0d063393539756ef2ba76c89302e9a94b6c17ce0c02d9bd81fb9fb768d40665b3823d7753f88e7903ad0a3107752a43d8559772c4290ef7c45d4ec8ae468430d7f2855f18a179bbe75e708b07e18693c3b98fdc6171252aafdfed255052688b92dce5d6b5e3da7dd0876c842131ae82f5fbb9abc889173de14ce5380ef6bd2bbd968114ebd5db3d20a77e59d3e2f858f95bb848cdfe5c4f1629fe1e5523afc811b08dea7c9390172ffdaca20947463ff0e9b0b7ff284d6832d6675e1e69a393b8f59d8b2f0bd25243a66f3257654d3281df3853855d7e5d6629eab8dde495b5cdb5561242cdc44ec6253844506decce005518fee94964d44eca979cb45bc073a8abb847c2
message = pow(signature, exponent, modulus)
print(f"{format(message, 'x')}")
1ffffffffffffffffffffffffffffffffffffffffffffffffffffffffffffffffffffffffffffffffffffffffffffffffffffffffffffffffffffffffffffffffffffffffffffffffffffffffffffffffffffffffffffffffffffffffffffffffffffffffffffffffffffffffffffffffffffffffffffffffffffffffffffffffffffffffffffffffffffffffffffffffffffffffffffffffffffffffffffffffffffffffffffffffffffffffffffffffffffffffffffffffffffffffffffffffffffffffffffffffffffffffffffffffffffffffffffffffffffffffffffffffffffffffffffffffffffffffffffffffffffffffffffffffffffffffffffffffffffffffffffffffffffffffffffffffffffffffffffffffffffffffffffffffffffffffffffffffffffffffffffffffffffffffffffffffffffffffffffffffffffffffffffffffffffffffffffffffffffffffffffffffffffffffffffffffffffffffffffffffffffffffffffffffffffffffffffffffffffffffffffffffffffffffffffffffffffffffffffffffffffffffffffffffffffffffffffffffffffffffffffffffffffffffffffffffffffffffffffffffffffffffffffffffffffffffffffffffffff003031300d060960864801650304020105000420444ebd67bb83f8807b3921e938ac9178b882bd50aadb11231f044cf5f08df7ce
Once again, the last digits match with the hash of the tbsCertificate of the R3 certificate:
3f0411ede9c4477057d57e57883b1f205b20cdc0f3263129b1ee0269a2678f63
Great, and now the last step! We just need to repeat the same procedure to verify the leaf certificate keenformatics.com using its parent R3.
# Convert the certificate to DER (binary) format
openssl x509 -inform PEM -outform DER -in keenformatics.com.cer -out keenformatics.com.der
# Convert the certificate to ASN.1 format
openssl asn1parse -inform pem -in keenformatics.com.cer >> keenformatics.com.asn1
# Show the content and copy the second line
sed -n 2p keenformatics.com.asn1
# 4:d=1  hl=4 l= 858 cons: SEQUENC

# Dump only the relevant part of the binary certificate that contains the tbsCertificate
dd if=keenformatics.com.der of=keenformatics.com.tbsCertificate skip=4 bs=1 count=862
# Compute the SHA-256 of the tbsCertificate
shasum -a 256 keenformatics.com.tbsCertificate
# f48cfa485c9d3f10c35ffb34960e42adbc4e98b81b1cd6f48ed3021dbc96e66b  keenformatics.com.tbsCertificate
The final calculation:
# Modulus and exponent from R3
modulus = 0x00bb021528ccf6a094d30f12ec8d5592c3f882f199a67a4288a75d26aab52bb9c54cb1af8e6bf975c8a3d70f4794145535578c9ea8a23919f5823c42a94e6ef53bc32edb8dc0b05cf35938e7edcf69f05a0b1bbec094242587fa3771b313e71cace19befdbe43b45524596a9c153ce34c852eeb5aeed8fde6070e2a554abb66d0e97a540346b2bd3bc66eb66347cfa6b8b8f572999f830175dba726ffb81c5add286583d17c7e709bbf12bf786dcc1da715dd446e3ccad25c188bc60677566b3f118f7a25ce653ff3a88b647a5ff1318ea9809773f9d53f9cf01e5f5a6701714af63a4ff99b3939ddc53a706fe48851da169ae2575bb13cc5203f5ed51a18bdb15
exponent = 65537
# signature from keenformatics.com
signature = 0x716fdab7821903c788ef9541e1a70869658e0bfc245895fc4d0008f8dfb11ea6666866360fd2f1a8b5b61ebe556b69082e62a70b7b95617b1b03e68ecc4a38e9e57bcfb07cf6685284f759c9c2c6e2bdbded6191ce8e91b916f8f573a69fd6992777469a8e4f53119839d4332fb340159e8ed8768379a8481cf37751e67dff34c492ba00aaa50fb22926efbdfd892082adc8fc26ecc6b9821c98a7e0ed3842075102eedaab7f6b6068841f69c5de433de520f06c09bd995c34ad45478a8be3638d84f4a1ffb9425fbf9cb1bb82e1e93e4a359d04bb99ce6092efb7a72046a0479c9aa04da0c3595982b448a5a3cdcc9a5c89f890e19d5578c6da2db5415097e6
message = pow(signature, exponent, modulus)
print(f"{format(message, 'x')}")
1ffffffffffffffffffffffffffffffffffffffffffffffffffffffffffffffffffffffffffffffffffffffffffffffffffffffffffffffffffffffffffffffffffffffffffffffffffffffffffffffffffffffffffffffffffffffffffffffffffffffffffffffffffffffffffffffffffffffffffffffffffffffffffffffffffffffffffffffffffffffffffffffffffffffffffffffffffffffffffffffffffffffffffffffffffffffffffffffffffffffffffffffffffffffffffffffffffffffffffffffffffff003031300d060960864801650304020105000420f48cfa485c9d3f10c35ffb34960e42adbc4e98b81b1cd6f48ed3021dbc96e66b
And yes, this matches with the hash of the tbsCertificate of the keenformatics.com certificate:
f48cfa485c9d3f10c35ffb34960e42adbc4e98b81b1cd6f48ed3021dbc96e66b
We have finally verified all three certificates in our hierarchy!
Final notes
Manually verifying an SSL certificate is definitely a long process. However, it can be a really useful practice to grasp a deeper understanding of SSL/TLS certificates and how they work. For me, it was a fun experience and made me appreciate even more how clever this protocol is.